Custom Built Wooden Computer Case
I've wanted to do a custom computer build for quite a while now, and I finally found the opportunity to build one when I traded an old laptop for a "mostly" working gaming rig. Some of the ports and buttons weren't functioning, and the previous owner had lost the 2 side panels to the case. The previous owner clearly didn't know what they had, and it didn't look like it had been used in some time. Hopefully he'll get more use out of the laptop.
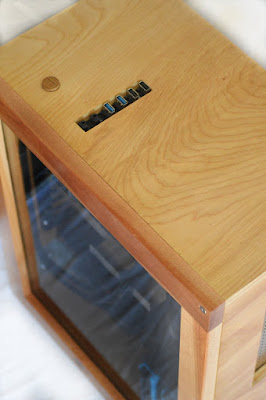
I wanted to make this truly custom, so I tore apart the case (literally) and built my own computer case out of birch. Yup, I said birch, as in wood! I also made the top plate out of plexi-glass so you can see all that beautiful hardware.
Here are the tech specs of the hardware going in this sweet machine:
- Intel i7 4790k processor
- 16GB (4x4) of Corsair Vengence RAM
- Asus Z97 Mainboard
- Thermaltake 750W Power Supply
- Corsair Water Cooler + (2) 4" Exhaust Fans + (1) 8" Intake fan w/ blue LED's
- (2) 128GB SSD's
- 1000GB HDD
- Asus GTX970 Graphics Card
Below you can see the remnants of the original computer case. This thing originally had (3) 8" fans, and (3) 4" fans, on top of the liquid cooler. Way overkill, in my opinion. I elected to only keep 3 of the 6 fans. Not to mention, I didn't want to build a box big enough to fit all of that equipment.
Here is the simple start to the new computer. Essentially a wooden drawer with a picture frame on top. I'd guess this case was roughly 70% of the size of the original case. It was definitely tough getting all of the components to fit in such a small space!
Here is one of the trial configurations, that I ultimately didn't go with. This would have required mounting the PSU over top of the motherboard, restricting access to the RAM. I didn't want to have to deal with removing the PSU just to swap out the RAM. It's also probably not ideal from an air flow perspective to have the PSU mounted directly over the motherboard. Also, with this setup you could just barely open the drive slots to get the drives in and out.
I finally settled on a general configuration and cut all of the necessary holes. It breaks down to cutouts for (1) 8" intake fan, the PSU, all of the ports from the motherboard, and one long rectangle for (2) 4" exhaust fans side-by-side (attached to the radiator on the liquid cooler).
Here's the box with the side panel frame, and a few coats of polyurethane. I also forgot to mention cutouts for a strip of USB ports, headphone, mic, and power switch.
Here are some pics after mounting all of the hardware, and the fan covers that I made out of aluminum sheeting.
After some cable cleanup, and mounting a sheet of Plexiglas in the side panel frame it was time to boot it up! Here are a few pictures of the finished product.
This was one of the coolest projects I've done in a long time. I couldn't be more proud of how this turned out. I learned a ton in the process, and I absolutely love booting up my computer and thinking back to all of the work that went into making this one of a kind custom PC.


Very impressive!
ReplyDelete